Photo Captions in Blogs
In the previous post here, Photo Captions in WordPress Blogs, the topic was the feature provided in the WordPress blogging service. Captions are a nice feature to explain the details of an image. There were questions about how to do captions for photos in Blogger blogs. This article takes up the subject and expands to Blogger blogs and blogs in general.
There is no native caption feature provided by Blogger, and there is no direct support in Live Writer. So, to do captions we do it the old-fashioned way and go back to using tables. That used to be very popular years ago when whole sites consisted of nothing but tables. That approach was cumbersome and is much despised and discouraged. However, it is a viable and relatively easy way to add captions to illustrations. Of course, it will work not just for Blogger blogs, but others as well. So it can be used on WordPress almost as readily as the feature.
Here are the details – using a table to caption a photo
|
|
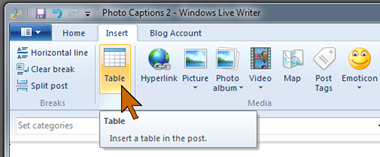
In Live Writer the table option is on the Insert tab.
Before we go into the details let’s take a look at the problem we have set for ourselves. The need for “captioning a photo” assumes that the photo accompanies text and is set within that body of text, either to the left or the right. We likely do not want the outlines that are so common with tabular data. The table tool in Live Writer by default sets the table the width of the blog column and centers it with no text to either the right or left of it. Indeed, the tool does not offer an alignment option. We will have to do that the hard way.
|
|
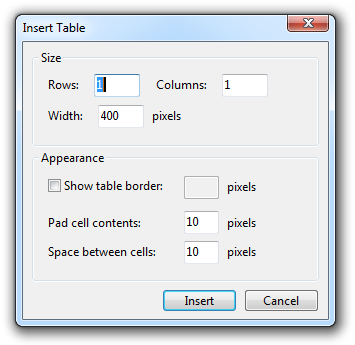
Clicking the Table tool brings up a small dialog to enter the details for the table. The dialog will look different for you the first time you use it and Live Writer will remember your settings for the next time.
For this use, captioning a photo, we need a table with just one row and one column.
The width is not critical at the outset as Live Writer will resize the table when you set the size of the photo once you have inserted it.
There is a check box for “Show table border” and a field for specifying the width of the border in pixels. For this application we don’t want a border. Unfortunately, Live Writer uses the style sheet set up for the blog theme or template and there may be some defaults that interfere with what we are trying to do. Uncheck the box, the field will be “grayed out” and no border width entry is required or possible.
Next come two other specifications, “Pad cell contents” and “Space between cells”. Both values are specified in pixels. These values are translated to HTML “cellpadding” and “cellspacing” attributes, respectively. Here again Live Writer may bow to the blog style sheet and be less than cooperative with you. Do remember that Microsoft has not seem fit to update this magnificent tool in the last few years.
We want some space between the blog text and the image, we will use the “Space between cells” value for that. A value of 10 should be fine. The “Pad cell contents” value specifies additional space within the cell, think of it as a margin setting. You would think that the two add to each other. They do. Yes, one or the other could be set to zero, but farther along in this article I will explain and added bonus feature, so go ahead and use 10 for this value also.
When you click Insert in the dialog you will see something like this on your screen:

The HTML code, as seem when you click the Source tab (lower left of Live Writer window) is like this:
We will need to add an attribute to this code to specify the alignment. You can do this at any time, but it is easiest to do it right away when the HTML code is at the end and easy to find. The attribute is align=”left” or align=”right” and needs to be added to the first line of the table HTML code. I like to add it just before the closing “>”. Live Writer will move it to where it likes it.
Move the cursor to the place in your post text where you want the image. Insert your table, click the Source tab. Find the table code. Move the cursor to the end of the “table” line but before the “>”. Type a space and then the align attribute. Obviously, if you want the picture on the left side, use align=”left” and if you want it along the right margin use align=”right”. Click the Edit tab to return to the normal display.
Click in the center space of the table. The cursor will be located inside the cell. I like to type my caption text before inserting the image, but it doesn’t matter. It works as you would expect. You can size the image as you normally do, the table size will be readjusted by Live Writer.
There is one thing I must caution you about: In Live Writer tables are not easy to move. It is easier to move the text that is around them.
Bonus
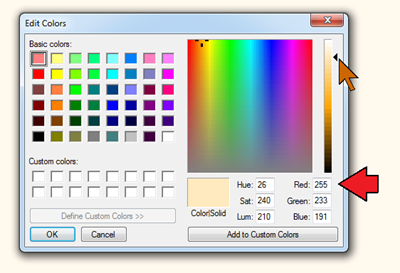
In elegant sites you may have admired photos not only being captioned, but also offset on a different color background. That is easy to do. First figure out the hex code for the color that you want for the background.  Your theme or template may already set the blog on a colored background, so you want your “image highlight” to be a color that is close, a little darker if it is a light background or a little lighter if you blog is on a dark background. What I do is this: I do a screen capture of one of my blog posts, paste it into Paint and use the color picker to load the background color into the color selector. Then I adjust the color for the background I want, see the pointer in the illustration. The values for read, green and blue (see the arrow) are then translated into hex for the HTML code. For the values here, 255, 233, 191, you get FF, E9, and BF (I use the Calculator in Programmer view). The HTML attribute to set this color as the cell background is bgcolor=”ffe9bf”. This attribute goes into the “td” line. Again it doesn’t matter where you put it, Live Writer will relocate it. It is easiest, however, to put it right at the start. See the HTML code illustration here and also the result in the normal edit view.

|
|
Alright, let’s try it. Here is a little bit of art to illustrate photo captioning as well as setting a background color for the image. Once you try this technique it will soon become much easier that you now might think after this long dissertation. Note that for the caption all the text editing features are available.
Also note that the image not only can be sized as desired, you can also insert a hyperlink. In this case it takes you to my Café Ludwig OneDrive photo album.
The only negative is that there can be style sheet overrides, as I mentioned before, that are hard to get rid off. For this article I left it as it defaults. I also published this article at This ‘n That to demonstrate the difference that the basic WordPress theme can make.
.:.
© 2014 Ludwig Keck
 The Table tool in Live Writer
 The Live Writer Insert Table dialog


