OLW Updated
Posted by Ludwig in Live Writer on May 24, 2017
Open Live Writer Build 0.6.2.0 released
A new version of OLW was released May 23, 2017.
This update is a maintenance release, no new features were added.

For details see GitHub OpenLiveWriter
Update installs automatically – just open OLW, close and reopen.
To download latest version go to openlivewriter.org
Also see Facebook page – Twitter

© 2017 Ludwig Keck
Live Writer Lives!
Posted by Ludwig in Blogging, General, Live Writer on December 9, 2015
Live Writer continues as Open Live Writer
There was an announcement today that will bring cheer to bloggers who have used and cherished Windows Live Writer. The team at Microsoft has been allowed to take this marvelous blogging tool to the open source community where its development and support can live on.
Long live Open Live Writer!
For the details go to Scott Hanselman’s blog post.
The website for the new tool is http://openlivewriter.org/. Download the initial version 0.5. It looks, feels, and works just like Windows Live Writer. There are some things that had to be left out. But the team will catch up and keep this the finest blogging tool bar none!
One more thing: This post was made entirely using the new Open Live Writer. It installed cleanly, downloaded the theme details from my blog, and worked smoothly. Even allowed me to put in the html code for the “boilerplate” on the bottom.
Great work OLW team! Continue on!!
Images in Posts
Posted by Ludwig in Blogging, Live Writer, OneDrive, sourcing images on March 15, 2015
Images In Posts – Sources and Methods
This is a revisit of this topic with updates and a look at how Live Writer works with the current versions of WordPress and Blogger.
Many new features have been implemented in the latest WordPress themes, and Blogger templates. Much is not supported by Live Writer since it has not been updated in the last three years, yet it still offers the best and easiest means of preparing blog posts. With higher resolution monitors and especially smart phones, tablets, and other devices, new questions arise on how to best deal with images.
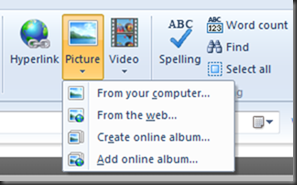 Live Writer has a number of ways for inserting images. In Inserting a picture from your computer
this article the options will be covered in turn. Both the Home and the Insert tab provide an Insert – Picture option. There are four option in the drop-down menu:
- From your computer…
- From the web…
- Create online album…
- Add online album…
Inserting a picture from your computer
Most of the images that you wish to show in a blog post most likely start out on your computer. Live Writer allows you to scale the image so it will fit and be positioned the way you like. Three standard sizes are offered and those sizes can be set by you. The sizes are Small, Medium, and Large. There is actually a fourth size: Original. For this blog my sizes are set so that images fit nicely into the blog column.
Here the Large size is 640 pixels wide to take up the width of the column. The Medium size is 320 px so that two will fit side by side. The Small size is set to 200 px, allowing three across. Live Writer will prepare scaled images with the specified border and any additional features. The illustration above uses a white border and a watermark. Both of these features are done in Live Writer. The image that appears in the blog post is called a “thumbnail”, even though it might be rather large. Jumping ahead of the story a little: Click on the image above – the “source” image is actually smaller than the thumbnail her.
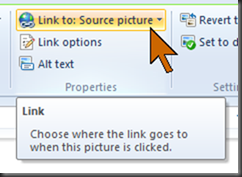 You do not need to prepare images to the desired size, Live Writer can do the scaling. However, there is something else to consider. An image in the post can link to something else. By default that is to the same picture, normally a larger version. On the Picture Tools tab (reached by clicking the image in Live Writer) you can set where the link goes to.
If you choose Link to: Source picture, when the visitor clicks the image the browser will show the “source” version. Most browser show it on a blank, white page, positioned in the upper left. That is not the prettiest way of doing it, but might be what you like.
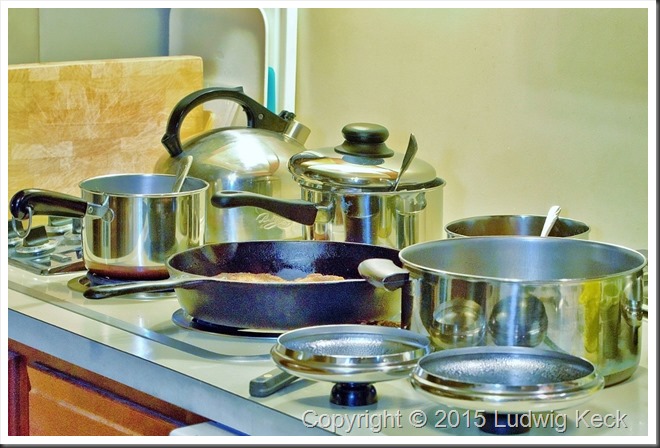
You can specify the size of this source picture that will be shown on the blank page with the Link options setting. Clicking that option brings up a little dialog as shown here. There are again four size options, the Small, Medium, Large, and Original sizes. The standard sizes are the same as the sizes for the thumbnails. The Original size, however, will be the actual size that the image is on your computer. Most modern digital cameras produce images way bigger than will fit conveniently into a browser window, even on the newer monitors or devices with their high resolution. That brings us back to the “however” above. You should scale your picture to a size that is appropriate. The image displayed by clicking the image link should show the picture better and larger, unlike the pots above. But you don’t want the source picture to overwhelm. For the past few years I have used “originals” that are 1024 px on the larger side. Those used to fill the browser nicely, but with the progress to higher resolution displays even in phones and small handheld devices, I have been using 2000 px lately. If you don’t link to another version of the image, of course, you need not worry about the original size as it will not be shown or uploaded.
Where to the images go?
Live Writer uploads the prepared “thumbnail” image and the “source” image, if used, to the blogging service. If you are using WordPress both images go into your Media library. This is a “flat” file, that is, it is not further divided, just a large shoe box full of pictures. If you are on Blogger, the images are uploaded to you Google album “Windows Live Writer”. NOTE: Blogger imposes a limit on the number of images uploaded for one post. You might run into that limit if you have a large number of photos. I did with a story on a car show last year, so I just split the post into two ( British Car Fayre 1 and British Car Fayre 2 ). Google storage rules are such that images smaller than about 2024 px are not charged to the space used.
Inserting pictures from the web
The second insert option in Live Writer is “From the web…”. 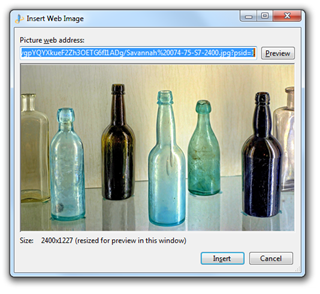 This allows a wide range of sources, but assuming that you want images of your own that you have online, the range shrinks quite a bit. When you click From the web… a small dialog pops up. You need the web address, URL, of the image, not the page it might be on.
NOTE: Although it is easy to get an URL of most any image on the Internet, you can’t just grab it and insert it into your blog. Plagiarism applies to images as it does to text. Don’t steal, don’t borrow, don’t “quote”, unless you have permission from the owner of the image. Stick to your own.
Where to store and get images
The easiest web place to store your images is, of course, your blogging service. Live Writer can upload pictures to your blogging service, but sometimes it might be easier to upload them yourself directly and then retrieve the URLs.
WordPress
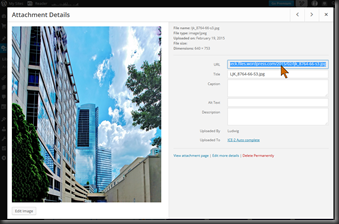 In your WordPress account Dashboard you have your Media Library. WordPress has made many improvements in this area. Uploading is easy and uses a drag-and-drop method. You can easily get the web address for images already in your WordPress Media Library, just go to the Media library, click on the image you want. The image URL is in one of the property boxes. You can also right-click the image and click Copy Image Location.
Blogger
If you have a Blogger blog, you have a Google account and, as noted above, 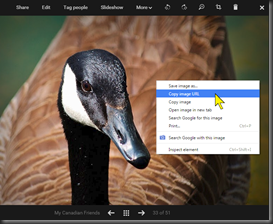 your images uploaded by Live Writer are in the Windows Live Writer album. Don’t add images manually to that album. The most recent additions go to the end of the normal listing and that may mean a lot of scrolling to find what you want. You can use any other album for storing photos, of course, and you can get the URL for any of your Google photos and insert them into a post. Just be sure that your album is made public so your readers will be able to see the image. To get the image URL from your Google Photos, right-click the image, then click Copy image URL, it will be loaded into your clipboard. Since this method does not involve the upload limit for a blog post, you can insert any number of images into your post.
Flickr
Flicker is one of the oldest photo sharing services and has some very nice features. Unfortunately, being friendly to blogging is not one of them, they don’t want to provide the URLs to your own images. So don’t plan on sourcing photos from Flickr. You can link to your images and albums there, they show nicely and you can provide slide shows. But for inserting an image in the post, forget Flickr.
OneDrive
Microsoft OneDrive, the former SkyDrive, is meant to be your file cabinet in the cloud. It is organized in folders and subfolders, so managing your images is really easy – just like on your desktop computer. Uploading is drag-and-drop. Getting to the URL is a matter of clicking on the image and then clicking View original. The image shows full size on a blank page and its URL is in the browser address field. Microsoft does a very good job of managing access to stuff in your OneDrive, so make sure that the folder is public.
Problems with images from the web
When you use pictures from the web, there are some concerns that you don’t need to address when using pictures from your computer option in Live Writer. An image on the web is stored in the size that was uploaded. As I mentioned above, for me that is nowadays 2000 px on the large side. When you use the Insert – From the web… procedure, Live Writer will insert the picture in whatever size it is. You can use the Size controls to get it to the size you like in the post. There is another “however” here. When someone looks at you blog post, the browser has to download the image and rescale it for display. That process is not as fast as downloading an image that is already the correct size. You blog post might not load as fast as you like and not as fast as it could if the images were the correct size already. If you use just a few images, that may not make a noticeable difference.
Create online album… – Add online album…
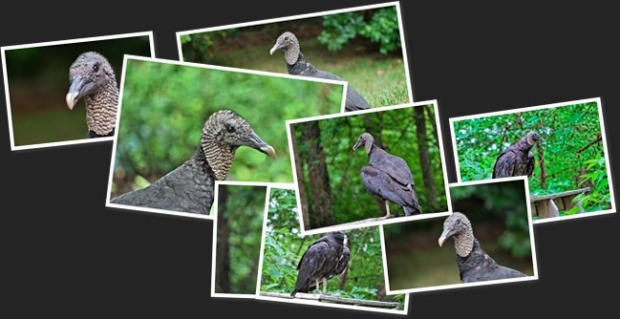
Live Writer has a delightful feature that it calls “online album”. A group of small thumbnails can be arrayed in different layouts as a representation of an entire album. Live Writer then uploads the entire album, or alternatively using an existing online album. Links are provided for seeing the pictures in the album. This feature goes back to the days even before SkyDrive. Live Writer used the Microsoft online storage service since its infancy and still works like a charm with OneDrive. However, it only works with OneDrive! There are some limitations that date back in time that have not been updated.
Take a look at such an “album”.
The dialog that comes up when Create online album… is selected allows you to drag pictures form your anywhere on your computer and combine them as one album.
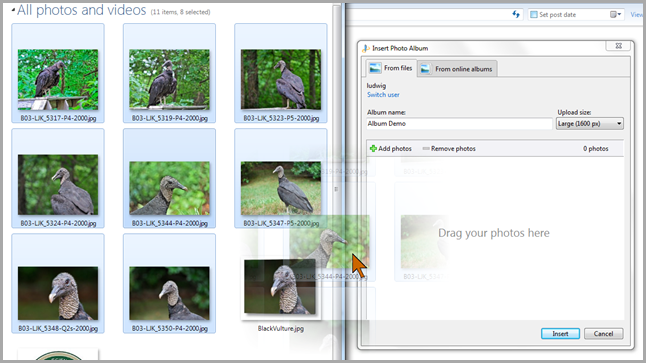
The album is inserted when you click Insert and then you have a large array of options as to layout and other features.
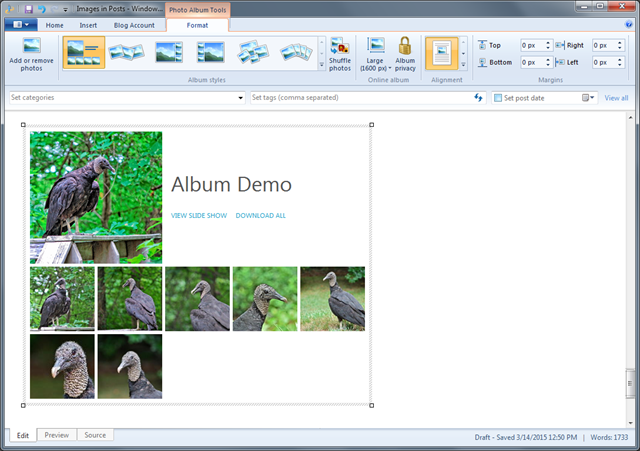
When you publish the post with an album, the images in the album are uploaded to your OneDrive, into an folder in the root of the OneDrive called by the album name you specified. Other images that you inserted “from your computer” will go to your blogging service.
But wait, there is more!
You can move that “album” folder in your OneDrive to another location. All the links will be correctly preserved.
So these are the methods for inserting images into a blog post using Live Writer. I have pointed out some of the items that you must be careful with. In spite of the fact that Live Writer has not been updated in years, it still provides features and convenience unmatched by any other tool.
.:.
© 2015 Ludwig Keck
Photo Captions 2
Posted by Ludwig in Blogging, Live Writer on August 29, 2014
Photo Captions in Blogs
In the previous post here, Photo Captions in WordPress Blogs, the topic was the feature provided in the WordPress blogging service. Captions are a nice feature to explain the details of an image. There were questions about how to do captions for photos in Blogger blogs. This article takes up the subject and expands to Blogger blogs and blogs in general.
There is no native caption feature provided by Blogger, and there is no direct support in Live Writer. So, to do captions we do it the old-fashioned way and go back to using tables. That used to be very popular years ago when whole sites consisted of nothing but tables. That approach was cumbersome and is much despised and discouraged. However, it is a viable and relatively easy way to add captions to illustrations. Of course, it will work not just for Blogger blogs, but others as well. So it can be used on WordPress almost as readily as the feature.
Here are the details – using a table to caption a photo
|
|
In Live Writer the table option is on the Insert tab.
Before we go into the details let’s take a look at the problem we have set for ourselves. The need for “captioning a photo” assumes that the photo accompanies text and is set within that body of text, either to the left or the right. We likely do not want the outlines that are so common with tabular data. The table tool in Live Writer by default sets the table the width of the blog column and centers it with no text to either the right or left of it. Indeed, the tool does not offer an alignment option. We will have to do that the hard way.
|
|
Clicking the Table tool brings up a small dialog to enter the details for the table. The dialog will look different for you the first time you use it and Live Writer will remember your settings for the next time.
For this use, captioning a photo, we need a table with just one row and one column.
The width is not critical at the outset as Live Writer will resize the table when you set the size of the photo once you have inserted it.
There is a check box for “Show table border” and a field for specifying the width of the border in pixels. For this application we don’t want a border. Unfortunately, Live Writer uses the style sheet set up for the blog theme or template and there may be some defaults that interfere with what we are trying to do. Uncheck the box, the field will be “grayed out” and no border width entry is required or possible.
Next come two other specifications, “Pad cell contents” and “Space between cells”. Both values are specified in pixels. These values are translated to HTML “cellpadding” and “cellspacing” attributes, respectively. Here again Live Writer may bow to the blog style sheet and be less than cooperative with you. Do remember that Microsoft has not seem fit to update this magnificent tool in the last few years.
We want some space between the blog text and the image, we will use the “Space between cells” value for that. A value of 10 should be fine. The “Pad cell contents” value specifies additional space within the cell, think of it as a margin setting. You would think that the two add to each other. They do. Yes, one or the other could be set to zero, but farther along in this article I will explain and added bonus feature, so go ahead and use 10 for this value also.
When you click Insert in the dialog you will see something like this on your screen:

The HTML code, as seem when you click the Source tab (lower left of Live Writer window) is like this:
We will need to add an attribute to this code to specify the alignment. You can do this at any time, but it is easiest to do it right away when the HTML code is at the end and easy to find. The attribute is align=”left” or align=”right” and needs to be added to the first line of the table HTML code. I like to add it just before the closing “>”. Live Writer will move it to where it likes it.
Move the cursor to the place in your post text where you want the image. Insert your table, click the Source tab. Find the table code. Move the cursor to the end of the “table” line but before the “>”. Type a space and then the align attribute. Obviously, if you want the picture on the left side, use align=”left” and if you want it along the right margin use align=”right”. Click the Edit tab to return to the normal display.
Click in the center space of the table. The cursor will be located inside the cell. I like to type my caption text before inserting the image, but it doesn’t matter. It works as you would expect. You can size the image as you normally do, the table size will be readjusted by Live Writer.
There is one thing I must caution you about: In Live Writer tables are not easy to move. It is easier to move the text that is around them.
Bonus
In elegant sites you may have admired photos not only being captioned, but also offset on a different color background. That is easy to do. First figure out the hex code for the color that you want for the background. 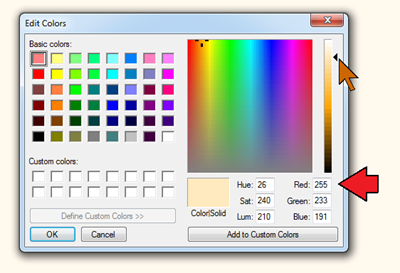 Your theme or template may already set the blog on a colored background, so you want your “image highlight” to be a color that is close, a little darker if it is a light background or a little lighter if you blog is on a dark background. What I do is this: I do a screen capture of one of my blog posts, paste it into Paint and use the color picker to load the background color into the color selector. Then I adjust the color for the background I want, see the pointer in the illustration. The values for read, green and blue (see the arrow) are then translated into hex for the HTML code. For the values here, 255, 233, 191, you get FF, E9, and BF (I use the Calculator in Programmer view). The HTML attribute to set this color as the cell background is bgcolor=”ffe9bf”. This attribute goes into the “td” line. Again it doesn’t matter where you put it, Live Writer will relocate it. It is easiest, however, to put it right at the start. See the HTML code illustration here and also the result in the normal edit view.

|
|
Alright, let’s try it. Here is a little bit of art to illustrate photo captioning as well as setting a background color for the image. Once you try this technique it will soon become much easier that you now might think after this long dissertation. Note that for the caption all the text editing features are available.
Also note that the image not only can be sized as desired, you can also insert a hyperlink. In this case it takes you to my Café Ludwig OneDrive photo album.
The only negative is that there can be style sheet overrides, as I mentioned before, that are hard to get rid off. For this article I left it as it defaults. I also published this article at This ‘n That to demonstrate the difference that the basic WordPress theme can make.
.:.
© 2014 Ludwig Keck
Photo Captions
Posted by Ludwig in Blogging, Live Writer on July 12, 2014
Photo Captions in WordPress Blogs
While Windows Live Writer has been essentially orphaned for several years, blogging providers have made progress and refinements in many areas. WordPress blog posts can have captions below photos that can make a post attractive and professional looking. The WordPress online editor is, like pretty much all other blog editors, an awkward to use non-WYSIWYG contraption. The finished blog post, however, can be quite good looking. Can the new feature be inserted when using Live Writer? Indeed, it can be done. It is not particularly elegant, and the process requires some added steps. Before I get into the details, here is a captioned photo.
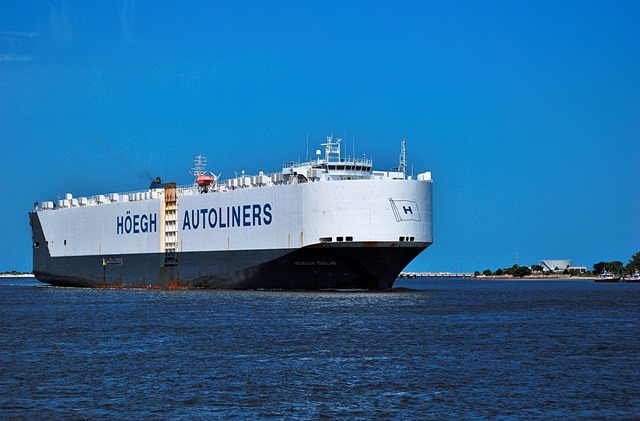
The car carrier Hoegh Delhi coming up the St. John’s River on its way to the port at Jacksonville, Florida
You can see that WordPress has added a frame background to the photo and the caption is in gray below the image.
The procedure for adding captions to photos
There are some constraints and gotchas, but the procedure in its most basic form is simple and straightforward.
WordPress supports this feature by specification text in square brackets. For the photo above the specification text is this:

The image is then inserted right after the first closing square bracket. It will then look like this:
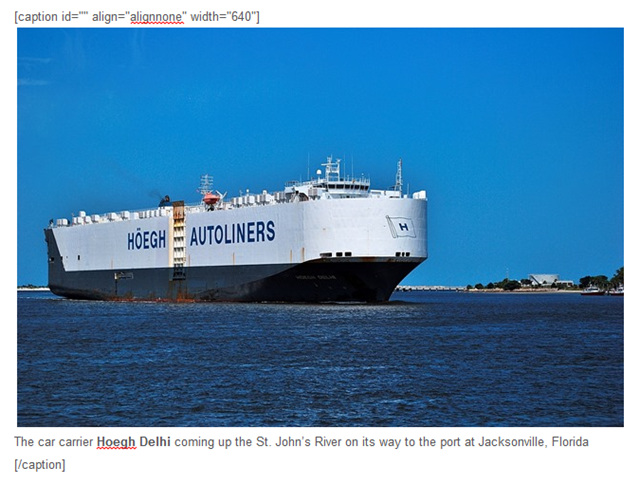
Basically that is all it takes. The bracketed text ahead of the image tells the WordPress editor to insert the background field and caption. You do not need anything in the id attribute. The align attribute will be mangled by the WordPress editor, so it really doesn’t matter much what you put in. In the WordPress editor it will wind up as “alignnone”. More about this farther down. The width attribute specifies the field size. This should be the same as the the size of the image that you insert.
The text following the image is the text that you want to appear as the caption. You can apply some editing features, like bolding. Even forcing a line break in the caption will work. You do that with Shift-Enter. The end of the caption is specified by /caption in square brackets.
If you want your image either left or right justified with text alongside, that can be done. Prepare it just like above, but with the appropriate width specification and apply the normal image alignment and margin settings. You will need to do some editing in the WordPress online editor.
There are some additional steps needed. If you do as I explained and you publish the post, the caption may not be there. My procedure is to not publish it, but to “Post draft to blog”. Then log in to your WordPress Dashboard and edit the post. If you just click back and forth between Visual and Text view, the WordPress editor will do its magic. If you have left or right aligned images you need to take care them in the WordPress online editor. In Text mode you can just correct the align attribute to alignright or alignleft. Use the preview option, View Post, to make sure that everything got taken care of.
To see an example of a blog post with captioned photos take a look at my article Museum Photography 2 in my Café Ludwig blog. I intentionally allowed some of the images to “stick out” from their caption fields, just an added little feature that you might also want to experiment with. Hint: Use different width specifications for caption field and the image.
Have fun, and good blogging!
.:.
© 2014 Ludwig Keck


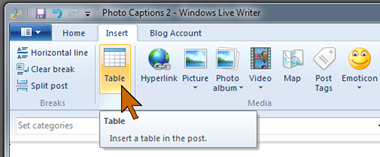 The Table tool in Live Writer
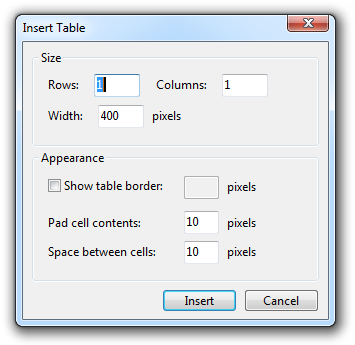 The Live Writer Insert Table dialog


